Sunday, December 19, 2010

Not even a mouse!

The last of my Christmas cards are finished--finally--going out in the mail. Hectic doesn't even begin to describe the past few weeks, with the birth of our puppy, the start of basketball season, and the last minute crunch of people who want embroidery done for Christmas! But, the last things are being stitched, and I'm ready to get to baking this week!
I got this a set of Penny Black Christmas stamps (Jolly Friends) earlier in the fall, and my last batch of cards just HAD to feature this adorable mouse!
I didn't have a stamp for my sentiment--so I used the computer and a font called Santa's Sleigh, a favorite of mine, to print the front note before I punched it out. Inside, of course, it says "Not even a mouse!"
I have a few other Christmas cards to post for your viewing pleasure--so keep checking back. And drop me a comment, if you feel so inclined, to let me know what you think!
Supplies used: Stamp--Penny Black "Jolly Friends"; Paper--GP white and BoBunny Wild Berry Red Dot; Ribbon--twill from Stampin' Up and gold from Joann's; Spellbinders Labels Eleven die; Stampin' Up ornament punch; brads from Hobby Lobby Christmas Section; Stickles' Stardust glitter glue; Fun Flock; Signo Gel Pen; and Copic markers as shown below:

Posted by Picasa

Monday, December 6, 2010

Having too much fun!

Isn't this little box just adorable?!?!?! I was trolling thru the blogs that I read, and getting side-tracked (as usual), when I found this Petal Top Box on Paper Pastime. I am just blown away by anyone who can figure these things out--and Denise nailed this one. It goes together like a dream, and all the cuts are just perfect. The little ornament I made (this one is 2-5/8") fits perfectly inside the box, and there's a raised holder to fit inside with a circle cut into it, great for nestling the ornament in. And even more--it's a one-sheet wonder! Just one sheet of 12x12 paper will make the box and the holder inside.
The file is in an .svg or .scut2 format, and can be cut if you have SCAL (SureCutsALot) software for your Cricut.
I can see LOTS of uses for this little box! Thanks, Denise!!!!!
I have more cards to post in the next few days, in between wrapping, shopping, and baking--so stay tuned!
Other items used: Cricut 'Very Merry Tags' cartridge for tag and deer; Dotted Scallop Ribbon Punch from Stampin' Up; Distress Ink (Ranger) in Brushed Corduroy; cardstock in kraft and wine.
Posted by Picasa

Friday, November 19, 2010

Certified!

My husband has always said I was 'certifiable'--although he meant that I was a little bit nuts over my crafts and hobbies. And I have to admit it--I am. If I'm working on a project, the house could fall down around me, and I wouldn't notice--I'd just brush the dust off my markers and paper and keep going! LOL

But this week, I was able to meet one of the goals I had set for myself when I started working with the Copic markers--I completed their Certification Class! A long day of soaking in information on the markers themselves, and on coloring techniques, and I still have quite a bit more to study in the book. It was so worth it, though, because I learned so much that day!

I was absolutely thrilled to have Debbie Olson as a teacher! I've followed her blog for a long time, and learned quite a bit from it--but in class, she was an awesome instructor, and made sure we all had the basics of the technique down before we moved on. THANK YOU, DEBBIE!

There are still more goals ahead of me--start teaching, eventually take the intermediate course--but everything comes one step at a time!

Sunday, October 10, 2010

Happy birthday, Joe!

Where does the time go? My nephew turned 20 this past week! He's a great guy, and always compliments me on my cards--but, of course, that makes doing the next card a little harder because I have to 'top' what I did the year before! LOL Or at least I think I do!
I had picked up this great Tim Holtz embossing folder of a crumbling brick wall--so I embossed a sheet of textured grey DCWV cardstock with it, and highlighted the bricks with Memento ink pads in 'Potter's Clay' and 'Rich Cocoa', to make it look more realistic. Then the Copic airbrush system to do a little 'graffiti'.
I didn't photo the inside--but the sentiment was computer generated: "The handwriting's on the wall--you're a year older!"
A fun card to do--and I know he'll love it!
Posted by Picasa

Saturday, October 2, 2010

Did you CELEBRATE today?

Did you? Did you get out your cardmaking supplies and celebrate World Card-Making Day? All around the world, cardmakers and crafters gathered together, or worked on their own, and made a card today that will brighten someone's day when they receive it!
Some of my favorite cards are not ones that look like they should be showcased in a magazine, or like they took years of artistic practice to make. No--my very favorites are ones that friends have made for ME. They took the time to cut, color, glue, whatever--and MADE me a card because they know that I will cherish it, and that I will truly value in the effort they put into it.
Is there someone waiting for you to make a card for them?


I'm definitely on a Christmas card roll, and I'm loving this paper pack from CTMH! From what I've heard, it's not available any longer, but the colors are just right for the Christmas mood I'm in this year.
This little snowman is one from a Penny Black clear stamp set--"Jolly Friends". Isn't he cute? I hadn't done a shaker card in a while, and I had to remember all the things I had used! But my Nestabilities (Spellbinders) came in very handy for cutting my frame and my label.

Both the label and the inside sentiment are computer generated (font--Androgyne), then air-brushed with E41 for just a bit of edging and definition. I once read that you should always "define the edges" of layers, and I think that really holds true.
The Copic colors I used are shown below, along with the Sakura Stardust gel pen for some hand-doodled snowflakes behind the snowman. My brads were from a pack in the Christmas section at Hobby Lobby (LOVE that store!).
So I hope I've inspired you to get some paper out and make a card tonight--it's not too late for the 'official' World Card-Making Day! But any day you can make a card to brighten someone's life is a day to celebrate!

Friday, October 1, 2010

Christmas Bells

Whether they are pealing out glad tidings, or jingling on the harness of a horse pulling a sleigh--the sound of bells makes us think of family, home, and being surrounded by love. That's the feeling I got when I saw this beautiful Hero Arts stamp, "Wreath with Bells". And what fun to color! It looks like it should take forever, but it really doesn't!
I decided on a gate-fold card for this, and a very simple setting since the image itself is busy. The paper is from a pack I purchased from CTMH, and the gold lines are sticker lines (Anita's Art Stamps). I cut the image out with my largest circle nestabilities die (Spellbinders), and left it in the die long enough to airbrush around the outside with E42. The I edged the circle a Krylon gold leafing pen.
I'm not sure where I got the sentiment for the inside. I have a 20-year collection of stamps, most of which are now unmounted from their original wooden handles.
The Copic colors I used are shown below.
I hope you enjoy this little card!
Posted by Picasa

Tuesday, September 28, 2010

Too Cute to Spook!

My sister's favorite holiday is Halloween--and she always goes all out with her decorating, clothing--everything--despite the fact that with living out in the country, she rarely gets any trick-or-treaters. But she's always ready for them! Where I live, also out in a rural area, I call to make sure my friends' children are coming and that I'm ready for them--our highest number ever was NINE little trick-or-treaters! But I don't go as all-out in decorating for Halloween. For 'fall'--yes--my house is filled with pumpkins and quilts and candles, but it will stay that way until just after Thanksgiving.
I do love seeing the kids dress up, and I love it when people have their pets in costume with them--I've been guilty of that occasionally, myself! So when I saw this adorable stamp set from Inkadinkadoo, called "Cat and Friends", I snapped it up. After all--my dog Piper looks just like the pup in this stamp!

The background cardstock is a mix of Bazill and DCWV, and the designer paper is "Boo Crew Masquerade" by BoBunny. The tag is from a Stampin' Up! stampset called "Tiny Tags", and punched with the coordinating punch they sell. And last, the image and the scalloped edge matte are cut with Nestabilities dies. Copic markers were used to color this (color numbers pictured below).
Thanks for stopping by my blog! Feel free to leave a comment and let me know you were here!
Posted by Picasa

Saturday, September 25, 2010

Christmas All Year-Long--September

Welcome to the September edition of the Magnolia-licious Christmas All Year-Long Blog Hop! I am leading off the Hop this month--so you're in the right spot to take a wonderful tour of some fantastic cards! Many thanks to Julie for setting the Hop up, to Deb for running the amazing Magnolia-licious Yahoo group, and to Diana of the Magnolia-licious Store, for bringing us all these wonderful Maggies to stamp with!
When I was little, waiting for Santa was just about the hardest thing I had to do. And when my boys were little--getting them to go to sleep on Christmas Eve was a real test of parenting skills! But no matter how old I've gotten, the impending thrill of Christmas Day, and the presents from Santa--yes, I DO still get presents from Santa!--are a part of the holidays that I would never ever want to lose. Doesn't everyone turn into a 5-year-old at Christmas-time, even if only for a little while?

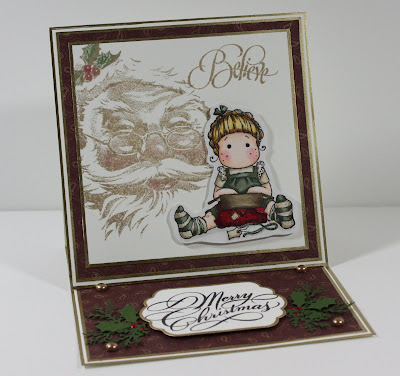
My card for the Magnolia-licious Christmas Year-Round blog hop brings back those memories, with Santa watching over little Tilda as she unwraps her presents.


The Santa and the wording is from a set I got last year from Flourishes, and Tilda is, of course, from Magnolia. I love using an easel card for this setting! It was a little hard to photograph, though--the printed paper is actually a little more burgundy than brown, but it just didn't want to show up that way.


The Merry Christmas panel was cut with a Nestabilities die, and all the pieces were edged with a Krylon Gold Leafing pen.


Thanks for stopping by! Please feel free to leave a comment below!


Your next stop is the beautiful card on Glenda's blog.


Supplies:


Stamps: Unwrapped Tilda (#3002, Magnolia); Santa--I Believe (#72, Flourishes) Paper: Ivory (Beckett Expression Candelight); Garland (Tis the Season Collection, Studio 8 Paper Co.); White (Beckett Expression Iceberg); scraps for greens Ink: Black (Memento); Latte (Adirondack); Gold (Krylon Gold Leaf Pen) Other: Gold Robins's Nest pearls; misc. punches; red metal jewel dots; chalk for cheeks and holly on Santa Copic Markers: as shown below:


Posted by Picasa

Sunday, September 19, 2010

Birthdays and more Birthdays!


Sunday afternoons--peaceful, serene, early fall. Good days to make the cards I need for some upcoming birthdays! I have several in the next 2 weeks, and no 'ladies' cards in my stash! What's up with that? So that was today's project:
I got this little stamp set--Happy Moments (Stampin' Up!) a few weeks ago, and decided it would be perfect for these cards. I stamped the packages, and cut them out with my rectangle Nestabilities (Spellbinders) die, then airbrushed the background with my Copic markers and Air Brush System. LOVE this effect when you leave the image in the die and get the white border! This is probably the first time I have ever done a card with this few colors!
The white panel is punched with a Martha Stewart border punch, and the purple ribbon was from Michaels. They had a great sale on ribbon when I was there yesterday--and if I had known it was double-faced satin ribbon, I think I would have gotten 2 rolls of every color!
I added Stardust Stickles to the ribbon tie on the package, and a dot between each 'for you' on the punched border.
(OOPS! Got one of my markers upside down!!!!!)
I hope you enjoyed your Sunday as much as I enjoyed mine! Thanks for stopping by!
Posted by Picasa

Wednesday, September 8, 2010

Hey Y'all! It's nearly Fall!

We're getting a little nip in the air these past few evenings in Ohio--and I am so looking forward to AUTUMN! I love all the seasons, but I have a special fondness for fall, with pumpkins, cool evenings to snuggle under a quilt, bonfires, football--and all the beautiful colors the trees start turning!
I'm not sure who gave me this little stamped Tilda, but she just was crying out for some leaves to jump into--I hope these are enough! She's colored with Copic markers (colors listed below), and I gave her an airbrushed background with some leaves and a basket (Stampin' Up!), and grass (Stamps by Judith).
Tilda is popped up from the background with some thin dimensional squares (Scrapbook Adhesives), and I added a little bit of a shadow under her feet just to ground her a bit.
I hope you're enjoying some cooler weather, too, after this hot, hot summer! Thanks for stopping by!
Posted by Picasa

Sunday, August 29, 2010

Knit 1, Purl 2

I have a very dear friend who lives in the Atlanta area, and we tend to 'enable' each other in our crafting hobbies. Cathy got me back into stamping--so I got her back into knitting! So when I saw this great little Karen Lockhart image (available at Ellen Hutson's store)--I just HAD to have it! I love love love her images, and they are great fun to color!
I'm not sure where I got the large eyelets, but they worked great to add some yarn to the card.
I found some great coordinating stamps in the new Stampin' Up! catalog in a set called "Hand Knit", which worked perfectly to finish off the inside of the card.

I don't have the list of Copic markers I used, but the papers are by GeorgiaPacific (white) and Prism (brown and kraft).
Posted by Picasa

Monday, August 23, 2010

Sweet Birthday Wishes!

Friends, I apologize for neglecting my blog the past few months--life has been a whirlwind getting ready for my son's wedding! I'll be posting pictures of the invitations and programs, and all the other things I made for the wedding, in a few weeks.
For today, though--here is a sweet little card I made for my dear friend's birthday in July. Once "Tilda Holding Lilacs" was colored (Copic colors listed below), I masked her off and airbrushed a light sky background, and a pale green ground. (Still practicing with airbrushing, but I'm getting a little more comfortable with it!)
I used a grass stamp from Judith Stamps to complete the scene, and highlighted the lilacs and the area around Tilda with Stardust Stickles.
Hope you enjoy seeing this little card as much as I did making it!

Posted by Picasa

Friday, June 25, 2010

Christmas All Year Long--June

I am so amazed how fast this summer is going by! Yes, I know it's just the very beginning of the summer 'season'--but golly, it seemed like I just did my May card! But that might be because as of yesterday (drum roll, please!), I finished all the invitations for my son's wedding! YAHOO! Now that doesn't mean that I am done with my duties as 'vice-president in charge of paper items' for the wedding--I have a list of things yet to do. But the invitations were the biggest, and I'm so happy how they turned out! I'll post them in a week or two, after they've gone out in the mail.
BUT--you didn't come here for that! You came for the Christmas All Year Long Blog Hop! Hopefully you've gotten here from Cheryl's blog, and you've seen some wonderful creations already! If not, and you'd like to start at the beginning, hop on over to the Magnolia-licious Christmas All Year Long Blog, and you can follow the list from there. Amazing creations await you!
My card started out one way, then Tilda changed her mind midway through. She does that to me a lot. And doggone it--she is so cute, I'm a pushover for letting her have her way! Candy Cane Tilda jumped up to the front of the line this time, and requested a holly card--so I've used a Cuttlebug holly embossing folder on red cardstock, and highlighted the design with white Colorbox ink. I added peppermint stripe and red dot ribbon, layered to make a band on the background.
Tilda was colored with Copics (see the colors at the bottom of this post), and I did some highlighting and dotting with a Sakura Stardust pen. I 'hope' the picture shows the sparkle this pen gave the card!
The green layer was a holly border punch by Fiskars. I've had it forever, I think, but never used it much. I'm glad I remembered it, because I love this look!
Many thanks to Deb, who runs our Magnolia-licious Yahoo group, and to Diana, the owner of Magnolia-licious Store. Between these two ladies, we have tons of inspirations at our fingertips, and a fabulous source for all our Magnolia stamps. Thank you ladies!!!!!
I hope you enjoy the rest of the hop--your next stop is Jessica's blog, and her cards are simply adorable!

I love reading your comments on my cards!
Posted by Picasa

Tuesday, May 25, 2010

Christmas All Year Long--May

Excuse me--have you seen the month of May? Mine seems to have come and gone so fast, I didn't realize it! All of a sudden, it's time for the Christmas All Year Long Blog Hop--even though it seems we just did this for April! Guess it is true that time flies when you are having fun--and I've been really enjoying the spring weather despite all the rain.
If you're doing the blog hop, you should have arrived here from Cheryl's blog . But if you've landed here purely by lucky chance, perhaps you'd like to start at the very beginning, at the Magnolia-licious Christmas All Year Long blog.
I gave myself some extra challenges on this--to use my new Copic air brush system, and to use my Cricut. I air-brushed the background of my circle with Y000--afraid to use too much color too soon, since this is the very first time I've used it. I left it in the Nestabilities die that I cut it in, so I could have a white rim to the circle. After I got Tilda colored, I added random dots with Sakura Stardust gel pen, and I used the Sakura Glaze (clear) pen to add some shine to the labels on the package.
The snowflake behind the image is cut with the Cricut using the 'When It's Cold Outside' cartridge. I outlined the circle and the edges of the snowflake with Stardust Stickles. Corners were added with the punch from Stampin' Up!, and gold pearls. My cardstock was from Georgia-Pacific and Prism, and the Christmas print was from Basic Grey. The Copic markers I used are pictured below.
Many thanks go out to Deb, who owns the Magnolia-licious Yahoo group, and to Diana, the owner of the Magnolia-licious Store --they keep us inspired, connected, drooling over new stamps, and set up with a great place to order them from! Thanks ladies!
Your next stop on the Blog Hop is Glenda's blog -- and she always has such beautiful cards!
Thanks for stopping by! Feel free to leave a comment or a question--I'd love to hear from you!

Posted by Picasa

Monday, May 17, 2010

Busy Busy Busy!

Wedding invitations. 'Nuff said?

My son gets married at the end of the summer, and when I said I'd make the invitations, he dubbed me the 'vice-president in charge of all paper products'. Then told me I was working for him. My reply? "Honey, you can't afford me!" LOL

But it's been fun working on this project. YES--it will be posted here eventually--but not until the invitations have gone out in the mail later this summer. All 150-175 of them!

I've been cutting and pasting and more cutting and more pasting. SO GLAD that I got an ATG tape gun a couple years ago--I'm going thru tape like crazy. Last night, I went thru nearly 4 rolls. And each roll is 36 yards long!

Then there are other projects to follow the invites--programs, place cards, menu cards, table numbers, rehearsal invites, shower invitations, and thank you notes. And I seriously couldn't do this if it weren't for my Cricut. I'm cutting more things on there than I ever would have dreamed, and it's saving me so much time.

This has been a labor of love, and I've enjoyed making everything--so hang in there with me and there will be pictures eventually. And a few cards that have been planning themselves out in the back of my mind, just waiting to be made!

Sunday, April 25, 2010

Christmas All Year Long--April

Time sure flies! It's time for the Magnolia-licious Christmas All Year Long Blog Hop again! You should have arrived here from Charlene Randall's blog--but if you've stumbled upon my blog by happy accident and would like to start at the beginning, please go to Magnolia-licious Christmas All Year Long Blog. I just know you won't want to miss a single one of these fabulous cards!
Tilda wanted me to go with a decidedly "green" theme this month, in honor of Earth Day, so we're decorating with the "greens"--evergreen and holly! I've really gotten into layering punches, so the little garland (detail below) mimics the background paper.
Many many thanks to Diana, who owns the Magnolia-licious Store, and to Deb, who runs the Magnolia-licious Yahoo group, for keeping us up-to-date on what's new and available in the Land of Magnolia.
Your next stop on the blog hop is the very talented Jenn Koss--her cards are amazing!
Your comments are precious to me--please let me know what you think of this card!
Supplies: Stamps--Jolly Wreath Tilda (Magnolia), and sentiment by Studio G (Series 37); Paper--Georgia-Pacific (white), Prism (dark green), designer paper (Holly Argyle by ProvoCraft), gold (MirroCard); Punches--branch and lattice (Martha Stewart), and holly leaf (Punch Bunch), and Sizzlits Lots of Tags Label 1 (Sizzix/Stampin'Up!); Ribbon--Offray; Stickles (CandyCane and Stardust); Nailheads (Metal Stickers, red); and Copics as shown below--


Posted by Picasa

Sunday, March 28, 2010

Happy Easter!

What a blessed time of year! Between the spring flowers poking their heads through the ground, the return of the songbirds, and the baby animals being born--we are all thankful for the blessings God had granted us!

I challenged myself again on this card, following along with Suzanne Dean's wonderful tutorial on coloring Scandinavian-style with Copic markers instead of distress inks. Suzanne always has suuch a great way of teaching the techniques, and inspiring me to try them!

While it seemed like this took a long time the first one, the rest colored up so fast (I made 7, total, for friends and family). I layered my card with a vellum panel that was first punched along the edge, then embossed with a Swiss dot embossing folder. LOVE THIS. I'll be using this more and more, now that I see what a great effect embossing vellum is!

My tiny double-loop boy was made easier by using a Bow-Easy--a great tool designed just for making perfect bows every time. (Suzanne also has a tutorial, for using this wonderful tool, on her blog.)

I hope you have a wonderful and blessed time with family and friends this Easter!

Supplies: Cardstock--GeorgiaPacific (white), Stampin' Up! (mellow moss), vellum (unknown); ribbon--Joann's brand (pink organdy); dimensionals--Scrapbook Adhesives; Magnolia stamps--Tilda Holding Bunny #335; Copic markers (as shown below).


Posted by Picasa

Thursday, March 25, 2010

Christmas All Year Long--March

Welcome! The year is going fast in the Magnolia-licious Christmas All Year Long Blog Hop! It's March already, and with spring in the air and crocuses in bloom, it's hard to concentrate on snow and winter.

You should have arrived here after visiting Cheryl Rowley's blog. If you just happened upon my blog, you might want to start at the beginning, which would be the Magnolia-licious Christmas All Year Long blog. Then you can follow us along, blog after blog, one beautiful card after another!

My card was a challenge to myself--to use some paper that was left from last year's cards. It was a beautiful paper from TPC Studio called Winter Blues Winter Wonderland, and I had quite a few pieces left. Adding the silver Mirror Card behind a cut-out oval gave me a perfect spot to place Tilda.

I'm not sure it shows in the picture, but I added sparkle to the fur on her hood and coat with a clear Spica glitter pen that I just got last weekend--love it!The paper itself had "Let it Snow" printed on one of the stripes, so I framed that on the lower part of the easel card with snowflakes. I don't know how many snowflakes I used--but can one have too many on a winter card? LOL! And any of them that the center was on top got a little gem in the middle.

While it looks like this card took a long time, it really didn't, and I'll probably make a few more like it before Christmas rolls around.

Many thanks go to Diana at Magnolia-licious Store, Deb of the Yahoo Magnolia-licious Group, and to our blog hop organizer, Julie!

Your next stop on the blog hop is with the talented Jessica Hammond. Enjoy the rest of your hop! And if you feel so inclined--leave me a comment and let me know what you think about my card! I love hearing from you!

Supplies: Cardstock--GeorgiaPacific (white), Mirror Card (silver), and TPC Studios (patterned paper); Nestabilities (oval die); Martha Stewart snowflake punch; The Paper Studio (gems); Magnolia stamp--Tilda #300 with Hood; Copic markers as shown.
Posted by Picasa